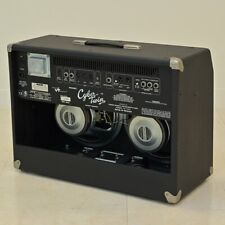
2 speaker extension jacks for experimenting with other external speaker cabinets
This page introduces key concepts for the basic operation of your Cyber–Twin SETM. The following pages provide an overview of each item on the front and rear panels.
TheDISPLAYshows vital information and menus for the Cyber-Twin®TheDATAWHEELworks dynamically with the display giving you full control over preset selection, effect parameters and system configuration. The display also responds to the use of panel knobs or buttons providing useful information. You can enter differentMODESto edit amplifier designs, effects and system utilities; each mode determines the functions of the display and data wheel.
PLAYMODEis active whenever the Cyber-Twin®amplifier is first switched on. After booting up, the display will show information about the current preset. The first line displays the preset location (bank/number) and name. The second line displays the type oftone stackcontrols (treble, middle, bass), tone stack location (pre/post distortion) and the active effect. In play mode, the data wheel selects presets.
There are three banks ofPRESETS. TheFENDERCUSTOMSHOP(C00-C99) andYOURAMPCOLLECTION(A00-A49) are permanent presets. ThePLAYER’SLOUNGE(P00-P99) presets are rewritable for you to save your own amp and effect designs.
The Cyber-Twin®is instantly reconfigured to the settings saved within a selected preset. The 8MOTORIZEDknobs on the Cyber-Twin®automatically adjust to the preset settings. You can safely interrupt knob rotation anytime by manually stopping it. Note that the display will temporarily indicate knob position when turned manually.
Changes you make to amplifier settings (volume, tone, effects, etc.) will be lost upon selecting a different preset or turning the amplifier off, unless you save them.SAVEsimply by pressing SAVE, selecting a Player’s Lounge preset to overwrite and pressing SAVE again. TheSAVELEDblinks as a reminder to save settings once a change is made.NOTE:MEMORYPROTECTIONmust be disabled before you can save! (see page 24).
AMPEDITMODE, FX EDITMODEandUTILITYMODEare activated by pressing the corresponding buttons to the right of the display. Use these modes for modifying amp design, selecting and editing effects and for system management.TUNERMODEis activated using the TUNER button; use it to tune your guitar.PLAYMODEis reactivated by pressing EXIT. Use it to play guitar!
TwoFOOTSWITCHESare supplied with your Cyber-Twin®SE. Connect them to the appropriate rear panel jacks to enable remote selection of your Quick Access buttons and Reverb/Effects bypass.A. INPUT JACK
Input connection for your guitar.
TRIM
Sets the input signal level for proper analog–to–digital conversion. Adjust TRIM so that most of the green LEDsstay on at normal playing levels and the red LEDflashes occasionally while playing at peak intensity. This knob is not preset programmable nor motorized.
GAIN
Adjusts the distortion level and contributes to overall amplifier loudness. Use VOLUME {D} to compensate for any undesired volume level change resulting from a GAIN level change.
VOLUME
Adjusts the post–distortion signal level and contributes to overall amp loudness. Use in conjunction with GAIN {C} to normalize volume differences between presets.
Several knobs affect the overall loudness of the amplifier:
Knob Function
TRIM Supply proper signal level to DSP
GAIN Adjust distortion level
VOLUME Equalize level differences between presets MASTER Global volume and maximum level governing
E. TREBLE / MIDDLE / BASS
Preset MIDI Programmable Controllable
NO NO YES YES YES YES NO YES
Expression Pedal Controllable
NO YES YES YES
Front Panel Overview
9
Adjusts tone in the high–, mid–, and low–frequency ranges respectively.
PRESENCE
Adjusts tone in the ultra-high frequency rangeafterthe distortion circuitry for a crisp tone sparkle.
REVERB
Adjusts the level of the active Reverb. Enter AMP edit mode to select Reverb types and edit Reverb parameters (see page 14).
MASTER VOLUME
Controls the overall loudness of the amplifierglobally,independent of any preset. MASTER VOLUME is not preset programmable, although it is motorized so that it can be controlled remotely by expression pedal or MIDI. Remote operation of MASTER VOLUME is limited to a maximum value defined by where the MASTER VOLUME is set manually on the front panel.
Set the MASTER VOLUME knob to the desired maximum level and motorized control will be confined to the range below that boundary.I.
J.
QUICK ACCESS
Provides instant access to four favorite presets. To assign a button, first select the preset with the data wheel. Then,press and holda QUICK ACCESS button. The LEDlights up when your new QUICK ACCESS button has been activated. Press the same button or corresponding footswitch button to recall the assigned preset.
SAVE
Saves the current amplifier configuration as a new preset.
1) Press SAVE once and a Player’s Lounge preset location is displayed.
2) Select any Player’s Lounge preset to overwrite using the data wheel.
Press EXIT to cancel the save operation
3) Press SAVE again and your new preset will be stored.
The SAVE LED flashes after an amp setting is changed as a reminder to save. If a different preset is selected before the current configuration is saved, your changes will be lost.
TUNER
Turns the tuner on/off. The TUNER LEDflashes and audio is muted while the tuner scale is displayed.
NOISE GATE
Turns the noise gate on/off. Use it to reduce static and environmental noise transmitted through nearby electronic devices. Enter AMP edit mode to edit noise gate depth and threshold parameters (see page 14).
TAP
In PLAY mode, TAP sets the time/rate interval of the active effect, if applicable. Press TAP at least twice at the desired rate to set the interval by feel (the average of the last five taps is calculated for multiple taps). Press TAP once for the longest interval possible. The TAP LEDflashes at the interval rate which is also temporarily displayed. Adjust the time/rate parameter accessed in the FX edit mode for precision control of the TAP interval (see the FX menus on page 16 for details).
In UTILITY mode, TAP is used to confirm menu actions.
PEAK and MIDI LEDs
PEAK flashes when the DSP circuit isclipping(distorting). Reduce VOLUME if undesirable distortion is heard while this LED is on, then use MASTER to the increase loudness level.
MIDI is on when the Cyber–Twin SETMis communicating MIDI information.
HUM REDUCTION
Turns hum reduction on/off. Reduces environmental hum in some situations using a patented algorithm that seeks out line frequencies and squelches only the hum, without degrading your music!
DISPLAY and DATA WHEEL
Your interface for controlling the dynamic functions described throughout this manual (See the Overview on page 8).
PRESET EDIT
The AMP and FX buttons activate the AMP and FX (effects) edit modes respectively. For the AMP edit menus see page 14; FX edit menus see page 16.
UTILITY
Activates the UTILITY mode. For the UTILITY edit menus, see page 24.
EXIT
Activates the default PLAY mode (except during factory preset restore and MIDI data transfers).
BLUE JEWELAA. POWER
Switches Power on or off to the Cyber-Twin®SE amplifier.
BB. IEC POWER CORD SOCKET
Connection for the included power cord. Connect to a grounded AC outlet in accordance with the voltage and frequency ratings listed on the rear panel of your Cyber–Twin SETM.
CC. FOOTSWITCH JACK
Connect the included Fender®4–button footswitch using the MIDI type cable provided. Use this footswitch to remotely activate the Quick Access presets. Although the footswitch uses a MIDI type cable, the footswitch is an analog device and should only be connected to the FOOT SWITCH jack.
DD. EXPRESSION PEDAL JACK
Connection for a standard expression foot pedal (optional) used to remotely control any of the following parameters: GAIN, VOLUME, TREBLE, MIDDLE, BASS, PRESENCE, REVERB, MASTER, any Reverb parameter, or any effect parameter. Expression pedal assignment is preset programmable through the AMP edit mode (see page 15).
EE. REVERB / FX BYPASS
Connection for the included one-button footswitch. Use this footswitch to remotely bypass Reverb and/or effects in one of 8 input/output configurations. Or, if Vibratone is the active effect, you can switch between rotor speeds (set Reverb/FX bypass parameter to Vibro Fast/Slow).
Reverb/FX bypass is preset programmable through the AMP edit menu (see REVERB / FX BYPASS on page